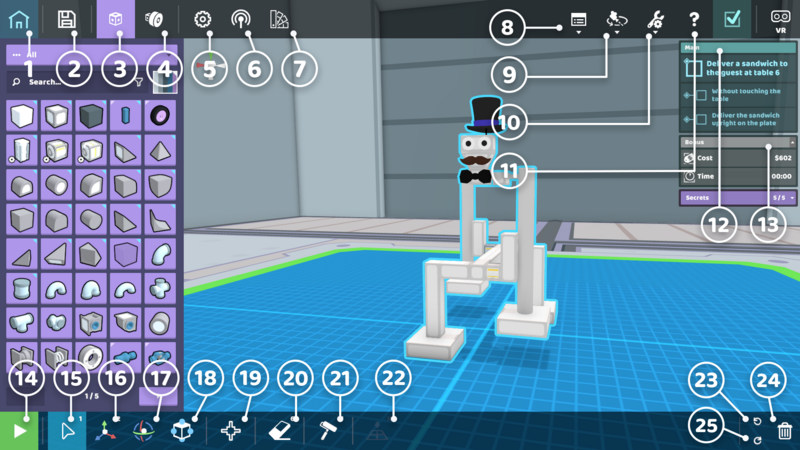
A basic guide to the interface of RoboCo

|
| 1
|
Menu
|
Opens the menu. Gives you the option to Return to Title Screen, access Options, or Quit.
|
| 2
|
Save and Load
|
Save and load your robots.
|
| 3
|
Parts
|
The Parts Menu, where players can access all robot building components.
|
| 4
|
Constructs
|
The Constructs Menu, where players can access pre-built robot parts for rapid robot construction.
|
| 5
|
Properties
|
The Properties Menu, where players can edit and tune the attributes of powered parts.
|
| 6
|
Controls
|
The Controls Menu, where players can edit and tune the attributes of powered parts.
|
| 7
|
Materials
|
The Materials Menu, where players can edit and tune the color and design of their robot.
|
| 8
|
Debug Console
|
A console for debugging your Python scripts for robot programming.
|
| 9
|
Camera Mode
|
Toggle between different camera modes.
|
| 10
|
Edit Mode Options
|
Change edit mode views.
|
| 11
|
Hints
|
Access to helpful in-game hints.
|
| 12
|
Main Objectives
|
Goals for the level (can be toggled on or off).
|
| 13
|
Bonus
|
Display of robot cost and time to complete the level.
|
| 14
|
Activate Button
|
Use this button to enter Active Mode and operate your robot. Press it again to enter Edit Mode.
|
| 15
|
Select Tool
|
This tool is used to click and drag parts in the build zone.
|
| 16
|
Translate Tool
|
This tool is used to move parts along the 3 axes.
|
| 17
|
Rotate Tool
|
This tool is used to rotate parts along the 3 axes.
|
| 18
|
Resize Tool
|
This tool is used to resize parts along the 3 axes.
|
| 19
|
Joint Tool
|
With a joint selected, this tool cycles through joint types or clears joints.
|
| 20
|
Erase Tool
|
This allows players to click on parts to delete them.
|
| 21
|
Paint Tool
|
This tool is used to paint robot parts by clicking
|
| 22
|
Send to Ground
|
This will send a player’s robot to the ground.
|
| 23
|
Undo
|
This is used to undo an action.
|
| 24
|
Redo
|
This is used to redo an action.
|
| 25
|
Trash
|
This button deletes the entire robot from the build zone.
|