Controls: Difference between revisions

From RoboCo
Jump to navigation Jump to search
Line 135: Line 135:
|-
|-
|}
|}
[[#top|Back to Top]]


===How to Create Custom Robot Schemes===

Revision as of 03:14, 2 November 2022

Control Interface Example

⚙ Controls Menu

Rotate Camera Right Mouse Button
Zoom Camera Scroll Wheel
Move Camera [W] [A] [S] [D]
Focus Camera [F] (with part selected)
Focus + Zoom Camera Double-tap [F] (with part selected)
Reset Camera [Control] + Left Mouse Button
Duplicate Part [Control] + [D] (with part selected)
Translate Tool Move parts in the environment or in the robot.
Rotate Tool Rotate parts in the environment or in the robot.
Change Joint Mouseover or Select Joints using [Q] and [E] to cycle through joint types and [Delete] to clear.
Remove Parts [Delete] (with part(s) selected)
Rotate Selection [Alt] + Left Mouse Button (with part(s) selected)
Rotate Snap [R] (while placing a part)
Place Duplicate [Shift] (while placing a part)
Multiselect [Shift] + Left Mouse Button
Select Connected Left Mouse Button (Double Click)
Box Select Click and drag to select multiple parts. Hold [Shift] to additively select.
Group Selected Parts [G]
Ungroup Selected Parts [U]
Undo [Control] + [Z]
Redo [Control] + [Y]
Hide UI [~]
Enter Active Mode [Space]
Robot Controls Default Controls (Left Hand)

[W] [A] [S] [D] [Q] [E]

Default Controls (Right Hand)

[I] [J] [K] [L] [U] [O]

(hold [L Shift] to move motors at half speed)

Switch Transmitters [1] [2] [3] … [8] [9] [0]

Back to Top

⚙ Robot Control Schemes & Re-Mapping

In RoboCo, you can choose between preset or custom controls for your robot. Using the Controls Menu, you can add, subtract or remap keys to fit your preferences.

Default Robot Control Schemes

Left Hand [W] [A] [S] [D] [Q] [E] Left Hand Controls 2.png
Right Hand [I] [J] [K] [L] [U] [O] Right Hand Controls 2.png

Back to Top

How to Map Robot Controls

Step Description Example
Step 1 Open the Controls Menu. How to Map Robot Controls Step 1 with Icon.png
Step 2 Select one of the Default Control Schemes. This example uses the Default Left Hand Control Scheme. How to Map Robot Controls Step 2 with Icon.png
Step 3 Click + Add New next to W. How to Map Robot Controls Step 3 with Icon.png
Step 4 Select a powered part from the menu. How to Map Robot Controls Step 4 with Icon.png
Step 5 Choose the desired action. Multiple parts may be assigned to one button, but only one action may be assigned per part. How to Map Robot Controls Step 5 with Icon.png

Back to Top

How to Create Custom Robot Schemes

Step Description Example
Step 1 Open the Controls Menu. How to Create Custom Controls Step 1 with Icon.png
Step 2 Click the + button at the top of the Controls Menu and select Custom Keyboard Controls. How to Create Custom Controls Step 2 with Icon.png
Step 3 Click the ellipses next to the Custom Keyboard Controls. Use this button to name your custom control scheme. How to Create Custom Controls Step 3 with Icon.png
Step 4 Click +Add New next to the top button slot. How to Create Custom Controls Step 4 with Icon.png
Step 5 Select a part and the action you want that part to take. How to Create Custom Controls Step 5 with Icon.png
Step 6 Rename the action if needed. How to Create Custom Controls Step 6.png

Back to Top

⚙ Controllable Robot Parts & Their Actions

Parts Actions Example
DC Motor Spin Forward

Spin Reverse

Toggle Forward

Toggle Reverse

Actions - DC Motor.png
Servo Motor Spin Forward

Spin Reverse

Toggle Forward

Toggle Reverse

Actions - Servo Motor.png
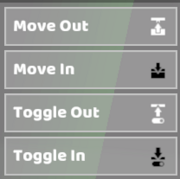
Small Piston Move Out

Move In

Toggle Out

Toggle In

Actions - Small Piston.png
Small Telescoping Piston Move Out

Move In

Toggle Out

Toggle In

Actions - Small Piston.png
Large Piston Move Out

Move In

Toggle Out

Toggle In

Actions - Small Piston.png
Laser Pointer Toggle (On/Off)

Turn On

Turn Off

Hold

Laser Pointer Controls.PNG
Powered LED Toggle (On/Off)

Turn On

Turn Off

Hold

Powered LED Controls.PNG
Vacuum Toggle (On/Off)

Turn On

Turn Off

Hold

Flip Airflow Direction

Vacuum Controls.PNG
Powered Pincer Toggle

Turn On

Turn Off

Hold

Actions - Powered Claw.png
Powered Claw Toggle

Turn On

Turn Off

Hold

Actions - Powered Claw.png
Light Bulb Toggle

Turn On

Turn Off

Hold

Lightbulb Controllable Actions.PNG
Microcontroller Send Signal (1)

Send Signal (-1)

Toggle Signal (1)

Toggle Signal (-1)

Microcontroller Controls.PNG
Bubble Blower Emit

Toggle (On/Off)

Turret Controls.PNG
Turret Emit

Toggle (On/Off)

Turret Controls.PNG

Back to Top