Controls: Difference between revisions
| Line 112: | Line 112: | ||
|Step 1 | |Step 1 | ||
|Open the Controls Menu. | |Open the Controls Menu. | ||
| | |[[File:How to Map Robot Controls Step 1.png|250px]] | ||
|- | |- | ||
|Step 2 | |Step 2 | ||
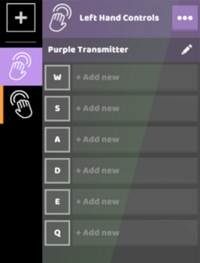
|Select one of the Default Control Schemes. This example uses the Default Left Hand Control Scheme. | |Select one of the Default Control Schemes. This example uses the Default Left Hand Control Scheme. | ||
| | |[[File:How to Map Robot Controls Step 2.png|250px]] | ||
|- | |- | ||
|Step 3 | |Step 3 | ||
|Click + Add New next to W | |Click + Add New next to W | ||
| | |[[File:How to Map Robot Controls Step 3.png|250px]] | ||
|- | |- | ||
|Step 4 | |Step 4 | ||
|Select a powered part from the menu | |Select a powered part from the menu | ||
| | |[[File:How to Map Robot Controls Step 4.png|250px]] | ||
|- | |- | ||
|Step 5 | |Step 5 | ||
|Choose the desired action. Multiple arts may be assigned to one button, but only one action may be assigned per part. | |Choose the desired action. Multiple arts may be assigned to one button, but only one action may be assigned per part. | ||
|[[File:How to Map Robot Controls Step 5.png|250px]] | |||
|- | |- | ||
|} | |} | ||
Revision as of 20:06, 7 July 2022
Controls Menu
| Rotate Camera | Right Mouse Button |
|---|---|
| Zoom Camera | Scroll Wheel |
| Move Camera | [W] [A] [S] [D] |
| Focus Camera | [F] (with part selected) |
| Focus + Zoom Camera | Double-tap [F] (with part selected) |
| Reset Camera | [Control] + Left Mouse Button |
| Duplicate Part | [Control] + [D] (with part selected) |
| Translate Tool | Move parts in the environment or in the robot |
| Rotate Tool | Rotate parts in the environment or in the robot |
| Change Joint | Mouseover or Select Joints using [Q] and [E] to cycle through joint types and [Delete] to clear. |
| Remove Parts | [Delete] (with part(s) selected) |
| Rotate Selection | [Alt] + Left Mouse Button (with part(s) selected) |
| Rotate Snap | [R] (while placing a part) |
| Place Duplicate | [Shift] (while placing a part) |
| Multiselect | [Shift] + Left Mouse Button |
| Select Connected | Left Mouse Button (Double Click) |
| Box Select | Click and drag to select multiple parts. Hold [Shift] to additively select. |
| Group Selected Parts | [G] |
| Ungroup Selected Parts | [U] |
| Undo | [Control] + [Z] |
| Redo | [Control] + [Y] |
| Hide UI | [`] |
| Enter Active Mode | [Space] |
| Robot Controls | Default Controls (Left Hand)
[W] [A] [S] [D] [Q] [E] Default Controls (Right Hand) [I] [J] [K] [L] [U] [O] (hold [L Shift] to move motors at half speed) |
| Switch Transmitters | [1] [2] [3] … [8] [9] [0] |
Robo Control Schemes & Re-Mapping
In RoboCo, you can choose between preset or custom controls for your robot. Using the Controls Menu, you can add, subtract or remap keys to fit your preferences.
Default Robot Control Schemes
| Left Hand | [W] [A] [S] [D] [Q] [E] | 
|
|---|---|---|
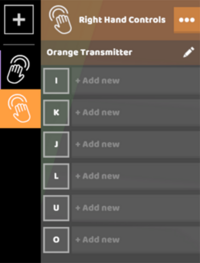
| Right Hand | [I] [J] [K] [L] [U] [O] | 
|
How to Map Robot Controls
| Step | Description | Example |
|---|---|---|
| Step 1 | Open the Controls Menu. | File:How to Map Robot Controls Step 1.png |
| Step 2 | Select one of the Default Control Schemes. This example uses the Default Left Hand Control Scheme. | File:How to Map Robot Controls Step 2.png |
| Step 3 | Click + Add New next to W | File:How to Map Robot Controls Step 3.png |
| Step 4 | Select a powered part from the menu | File:How to Map Robot Controls Step 4.png |
| Step 5 | Choose the desired action. Multiple arts may be assigned to one button, but only one action may be assigned per part. | File:How to Map Robot Controls Step 5.png |
How to Create Custom Robot Schemes
| Step | Description | Example |
|---|---|---|
| Step 1 | Open the Controls Menu. | |
| Step 2 | Click the + button at the top of the Controls Menu and select Custom Keyboard Controls | |
| Step 3 | Click the ellipses next to the Custom Keyboard Controls. Use this button to name your custom control scheme. | |
| Step 4 | Click +Add New next to the top button slot | |
| Step 5 | Select a part and the action you want that part to take | |
| Step 6 | Rename the action if needed and map it to the desired key |
How to Program Your Robot Using Python
RoboCo allows for robot programming via the use of Python! If you’re interested in robot programming but don’t know much about Python, we recommend checking out CodeAcademy to learn more. We also recommend checking out our devblog “A Guide to Robot Programming” to learn more about what script editors we recommend. You can also join our Official RoboCo Discord where we have a dedicated channel where developers and Discord members alike help share players with troubleshooting code.
| Step | Description | Example |
|---|---|---|
| Step 1 | Add the microcontroller to your robot to access the script interface | |
| Step 2 | Choose to either create a new script or load an already-created script | |
| Step 3 | Assign your parts to ports manually or use the “automatically assign” button | |
| Step 4 | Press the play button (or spacebar) | |
| Step 5 | If an error occurs, use the in-game debug console to fix your code |
Controllable Robot Parts & Their Actions
| Parts | Actions | Example |
|---|---|---|
| DC Motor | Spin Forward
Spin Reverse Toggle Forward Toggle Reverse |
|
| Servo Motor | Spin Forward
Spin Reverse Toggle Forward Toggle Reverse |
|
| Small Piston | Move Out
Move In Toggle Out Toggle In |
|
| Small Telescoping Piston | Move Out
Move In Toggle Out Toggle In |
|
| Large Piston | Move Out
Move In Toggle Out Toggle In | |
| Laser Pointer | Toogle
Turn On Turn Off Hold |
|
| Powered LED | Toggle
Turn On Hold Toggle |
|
| Vacuum | Toggle
Turn On Toggle Off Hold |
|
| Powered Pincer | Toggle
Turn On Toggle Off Hold |
|
| Powered Claw | Toggle
Turn On Turn Off Hold |
|
| Light Bulb | Toggle
Turn On Turn Off Hold |
